Manual Coffee Makers⁚ A Guide to Brewing the Perfect Cup
Manual coffee makers are a great way to brew delicious coffee at home; They allow you to have more control over the brewing process, which can result in a more flavorful cup of coffee․ These makers are a great option for those who want to learn more about coffee brewing and enjoy a more hands-on experience․ There are many different types of manual coffee makers available, each with its own unique advantages and disadvantages․ Whether you are a seasoned coffee enthusiast or a casual drinker, there is a manual coffee maker out there for you․
What is a Manual Coffee Maker?
A manual coffee maker, often referred to as a “pour-over” coffee maker, is a brewing device that relies on gravity and the user’s manual actions to extract coffee from ground beans․ Unlike automatic coffee makers, which handle most of the brewing process, manual coffee makers require more active participation from the user, allowing for greater control over the brewing process and potentially leading to a more flavorful cup of coffee․ Manual coffee makers typically consist of a filter holder, a carafe or mug, and a kettle or other water source․
The process of brewing coffee with a manual coffee maker generally involves the following steps⁚
- Grinding the Coffee Beans⁚ Freshly ground coffee beans are essential for optimal flavor․ The grind size should be consistent and appropriate for the chosen brewing method․
- Heating the Water⁚ Water should be heated to a specific temperature, usually between 195°F and 205°F (90°C and 96°C), for optimal extraction․
- Pouring the Water⁚ The hot water is carefully poured over the coffee grounds in a controlled manner․ This allows for even extraction and prevents over-extraction, which can lead to a bitter taste․
- Brewing⁚ The water passes through the coffee grounds, extracting the oils and flavors․ The brewing time can vary depending on the method and desired strength․
- Serving⁚ Once the brewing is complete, the coffee can be enjoyed․
Manual coffee makers are popular among coffee enthusiasts who appreciate the ritual and control they offer․ They are also a great option for those who want to experiment with different brewing techniques and explore the nuances of coffee flavor․
Types of Manual Coffee Makers
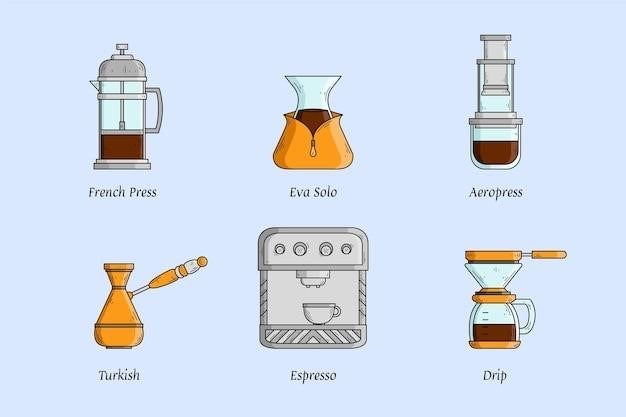
The world of manual coffee makers offers a diverse range of options, each with its own unique features and brewing styles․ Whether you are a seasoned coffee connoisseur or a curious beginner, there is a manual coffee maker out there to suit your taste and preferences․ Here are some of the most common types of manual coffee makers⁚
- Pour-Over Coffee Makers⁚ Pour-over coffee makers are a popular choice for those seeking a simple and controlled brewing experience․ They typically consist of a cone-shaped filter holder, a carafe or mug, and a kettle for pouring hot water․ The process involves slowly pouring hot water over the coffee grounds, allowing the water to drip through the filter and into the carafe․ Popular pour-over methods include the Hario V60, the Chemex, and the Kalita Wave․
- French Press⁚ The French press, also known as a cafetière, is a simple and elegant method for brewing coffee․ It features a glass carafe with a plunger that contains a mesh filter․ Coffee grounds are steeped in hot water for several minutes before the plunger is pressed down, separating the coffee from the grounds․ The French press is known for producing a full-bodied and flavorful coffee, as it allows for a longer brewing time and extraction of oils․
- AeroPress⁚ The AeroPress is a versatile and portable coffee maker that combines elements of a French press and a pour-over․ It uses pressure to force hot water through coffee grounds, resulting in a smooth and concentrated brew․ The AeroPress is known for its ability to produce a variety of coffee styles, from strong espresso to light and airy coffee․
- Moka Pot⁚ The Moka pot, also known as a stovetop espresso maker, is a classic Italian brewing method that uses steam pressure to brew coffee․ It consists of a bottom chamber for water, a filter basket for coffee grounds, and a top chamber for brewed coffee․ The Moka pot produces a strong and concentrated coffee that resembles espresso, although it does not reach the same level of pressure․
Each type of manual coffee maker offers a unique brewing experience and flavor profile․ Experimenting with different methods can help you discover your preferred brewing style and unlock the full potential of your favorite coffee beans․
Benefits of Using a Manual Coffee Maker
Embracing the art of manual coffee brewing goes beyond simply making a cup of coffee; it’s a journey of discovery, control, and appreciation for the nuances of flavor․ Manual coffee makers offer a range of benefits that elevate the coffee experience, making each cup a personal and satisfying ritual․
- Enhanced Flavor and Control⁚ Manual coffee makers allow you to have complete control over the brewing process, from the grind size to the water temperature and extraction time․ This level of control allows you to fine-tune the brewing process to extract the optimal flavors from your coffee beans, resulting in a richer and more complex cup of coffee․
- Freshly Ground Coffee⁚ Manual coffee makers often encourage the use of freshly ground coffee beans, as pre-ground coffee can lose its flavor and aroma quickly․ Grinding your own beans ensures that you are using the freshest possible coffee, maximizing flavor and freshness․
- Personalized Brewing Experience⁚ Manual coffee makers offer a personalized brewing experience, allowing you to experiment with different brewing methods, grind sizes, and water temperatures to discover your preferred coffee style․ This hands-on approach fosters a deeper appreciation for the coffee brewing process and allows you to tailor your brew to your specific taste preferences․
- Cost-Effective⁚ Manual coffee makers are generally more affordable than their automated counterparts, making them a budget-friendly option for coffee enthusiasts․ You can enjoy a delicious cup of coffee without breaking the bank, making manual brewing a sustainable and economical choice․
- Sustainability⁚ Manual coffee makers often use less energy than automated machines, making them a more sustainable choice for those who are environmentally conscious․ They also minimize waste, as they typically do not require disposable pods or filters․
By embracing the art of manual coffee brewing, you can elevate your coffee experience, discover a world of flavor, and create a personalized ritual that brings joy to your daily routine․
Choosing the Right Manual Coffee Maker
Navigating the world of manual coffee makers can feel overwhelming, with a diverse range of options catering to various brewing preferences and skill levels․ Choosing the right manual coffee maker is a personal journey, guided by your individual needs and the type of coffee experience you seek․
- Consider Your Brewing Preferences⁚ Reflect on the type of coffee you enjoy most․ Do you prefer a bold and robust brew or a lighter and more delicate cup? Do you enjoy experimenting with different coffee beans and brewing methods?
- Ease of Use⁚ If you are new to manual coffee brewing, start with a user-friendly option like a French press or a pour-over coffee maker․ These methods are relatively simple to master and offer a great introduction to the world of manual brewing․
- Budget⁚ Manual coffee makers come in a wide range of prices, from budget-friendly options to premium models․ Determine your budget and look for a coffee maker that offers the features you desire within your price range․
- Grind Size⁚ Consider the grind size you prefer․ Some manual coffee makers, like the French press, require a coarse grind, while others, like the pour-over coffee maker, prefer a finer grind․ Choose a coffee maker compatible with your preferred grind size․
- Capacity⁚ Decide how much coffee you typically brew․ If you are brewing for one or two people, a smaller coffee maker will suffice․ If you are brewing for a larger group, opt for a larger capacity coffee maker․
- Features⁚ Explore additional features that might enhance your brewing experience, such as a built-in thermometer, a pre-infusion feature, or a timer․
By carefully considering your needs, preferences, and budget, you can choose a manual coffee maker that will allow you to brew delicious coffee at home and embark on a rewarding journey of coffee exploration․
Tips for Making the Best Coffee with a Manual Maker
Mastering the art of brewing delicious coffee with a manual coffee maker is a journey of experimentation and refinement․ While each manual coffee maker has its own nuances, here are some general tips to help you brew the perfect cup⁚
- Use Freshly Ground Beans⁚ Freshly ground coffee beans offer the most flavorful and aromatic brew․ The oils and volatile compounds in coffee beans start to degrade quickly after grinding, so use freshly ground beans whenever possible․
- Choose the Right Grind Size⁚ Different brewing methods require different grind sizes․ A coarser grind is ideal for French press coffee makers, while a finer grind is better suited for pour-over coffee makers․ Experiment to find the ideal grind size for your preferred coffee maker and taste․
- Use Filtered Water⁚ Water plays a crucial role in coffee brewing․ Filtered water removes impurities that can affect the taste of your coffee;
- Maintain the Correct Water Temperature⁚ The ideal water temperature for brewing coffee is between 195°F and 205°F (90°C and 96°C)․ Water that is too hot can burn the coffee grounds, while water that is too cold will not extract the full flavor․
- Bloom the Grounds⁚ Before brewing, pour a small amount of hot water over the coffee grounds and let them bloom for 30 seconds․ This process helps to release carbon dioxide from the grounds, which can improve the extraction process․
- Pour Slowly and Evenly⁚ When using a pour-over coffee maker, pour the hot water slowly and evenly over the coffee grounds․ This ensures that all of the grounds are evenly saturated and extracted․
- Experiment with Different Brewing Ratios⁚ The ratio of coffee grounds to water can affect the strength and flavor of your brew․ Experiment with different ratios to find the perfect balance for your taste․
- Clean Your Coffee Maker Regularly⁚ Regular cleaning is essential for maintaining the quality of your coffee maker and ensuring a clean and flavorful brew․ Follow the manufacturer’s instructions for cleaning your specific coffee maker․
Remember, brewing coffee is a personal journey․ Experiment with different techniques, grind sizes, and brewing ratios to find what works best for you․ Enjoy the process and the delicious results!
Popular Manual Coffee Maker Brands
The world of manual coffee makers is filled with a diverse array of brands, each offering unique features and brewing experiences․ From established names to innovative newcomers, these brands have earned a reputation for quality, craftsmanship, and a commitment to delivering exceptional coffee․ Here are some popular manual coffee maker brands that are highly regarded among coffee enthusiasts⁚
- Hario⁚ Hario is a renowned Japanese brand known for its exquisite glass and ceramic pour-over coffee makers․ Their V60 dripper, with its distinctive conical design, is a favorite among home brewers for its precision and control․ Hario also produces a range of other manual coffee makers, including French presses and siphon coffee makers․
- Chemex⁚ Chemex is a classic brand that combines functionality with elegant design․ Their iconic hourglass-shaped coffee maker, made from heat-resistant glass and a wooden collar, is a statement piece in any kitchen․ Chemex is known for its smooth and clean extraction, resulting in a balanced and flavorful brew․
- Bodum⁚ Bodum is a Swiss brand known for its stylish and affordable coffee makers․ Their French presses are particularly popular, featuring a durable glass carafe and a stainless steel plunger․ Bodum also offers a range of other manual coffee makers, including pour-over drippers and percolators․
- Fellow⁚ Fellow is a relatively new brand that has quickly gained popularity for its innovative and high-quality coffee products․ Their Stagg EKG electric kettle is a favorite among coffee enthusiasts for its precise temperature control and stylish design․ Fellow also offers a pour-over dripper, the Stagg XF, that is designed for optimal brewing precision․
- AeroPress⁚ AeroPress is a unique manual coffee maker that combines the elements of a French press and a pour-over․ It uses pressure to force hot water through coffee grounds, resulting in a concentrated and flavorful brew․ AeroPress is known for its portability and versatility, making it a popular choice for both home and travel․
These are just a few of the many popular manual coffee maker brands available․ When choosing a brand, consider your preferences for brewing method, design, features, and price․ With a little research, you can find the perfect manual coffee maker to elevate your coffee experience․